CLICK HERE FOR FREE BLOGGER TEMPLATES, LINK BUTTONS AND MORE! »

Tuesday, August 31, 2010

Q is for Quinceanera!

1. Start with a lot of Bashful Blue card stock.

2. Add in some Whisper White card stock and a little Vellum.

3. Sprinkle with tons of Crystal Stickles and white gel pen dots.

4. Punch out hundreds of scallop and stamped circles.

5. Fold and cut paper for many hours.

6. Use every scrap of red line adhesive you can lay your hands on.

7. Run your Elegant Bouquet embossing folder through the Big Shot hundreds of times.

8. Quality control check each belly band for the perfect fit.

9. Keep plenty of foil and wax paper on hand to keep scallop border punch fine tuned!

The end result is 150 Quinceanera Invitations and envelopes!


That's a lot of paper, adhesive, and ink, but what a great project!


Happy Quince Anos and crafting!

Sunday, August 29, 2010

Versamark and Chalk?

Yes, you read correctly.  During my YouTube video tutorial marathon session, earlier this week, I saw not one but two videos talking about using chalk with Versamark.  I decided to try it for myself because I couldn't tell what the end product looked like from either video.  I have owned a box of chalks for about 5 years and I can count on one hand the number of times I have opened that box.  Most of the chalks have never been used, but I will be using them now!


I started the project with some Very Vanilla, left overs from when I made my Squash Book.  The stamp set is  Merci by Stampin' Up--I love everything French!  I inked my stamps with Versamark and applied chalk to the stamped images with a q-tip. It was as simple as that!


I love the soft fuzziness of the image.  When you are satisfied with your image you simple tap the paper and blow away any excess.  I was concerned that the image might smear because you do not emboss it with a heat tool, but it sets without heat.  I had a couple of my initial attempts in an envelope in my purse for a couple of days. They looked the same each time I took them out of the envelope.

I also used the Versamark to stamp the More Mustard card stock with stamps from the Merci set to give it a tone-on-tone look.  I did set the Versamark on the card stock with clear embossing powder and a heat tool.

I mounted both panels on DSP Patterns Stack Regals Collection. The polka dot is Bravo Burgandy and the stripe paper is Not Quite Navy.  I love the Regals Collection!  The colors are so warm and vibrant.  The gem stickers are from the Martha Stewart birthstone  package--I love these embellishments also!  I hope you will give this technique a try!  Happy Crafting!

Saturday, August 28, 2010

Love Letter DSP Squash Book

Earlier this week I was watching videos on YouTube, one of my new obsessions, and I came across a tutorial called Squash Book with Dawn.  I had never heard of a Squash Book.  This project is fast, fun, and completely awesome!  Dawn Griffith's video tutorial is at the end of this post.  Here's my cover!  
I used Very Vanilla to construct the pages and Love Letter DSP for the background papers.  These DSP papers have a vintage quality to them, so I inked the edges to age the Very Vanilla card stock.  Journaled with my stampin' write basic black marker and added a miscellaneous black ribbon and Martha Stewart birthstone gem stickers to give the cover a simple old world look.

When you untie the ribbon and fold back the cover, the first page of your squash book is revealed.  

Open the squash book further and you will find an amazing amount of space for photos, journaling, and embellishment!  

What's more you have even more room on the flip side of this paper album!
The finished album is 4.25" square.  I decided to print my photos in black and white to go along with the aged look.  If you decide to cut your photos on the diagonal to fit the triangle shaped folds--lay your photos out first!  I ended up repositioning a few of my square photos so the photos all flowed the same direction.

As promised here is Dawn's video!  I hope you try this project out! :) Happy Crafting!


Wednesday, August 25, 2010

Jo-Ann Craft for a Cause Contest Announced

Craft for a Cause Contest 2010 logoJo-Ann Fabric and Craft Stores have announced a new Craft for a Cause contest!  


Crafters - Enter to win $1,500 Gift Card and Jo-Ann will donate a total of $90,000 to three causes--see link below for details!  If you decide to enter the contest, and we hope you will, please e-mail us a photo of your submission to: info@crafthavenretreats.com  We will be happy to share your project with our followers.


Contest Dates are as follows:
Begins August 15, 2010 and ends October 30, 2010
Charity voting ends December 4, 2010

Click here to  Enter On-Line Now

.  


Tuesday, August 24, 2010

Sneak Peek - August Stamp Club

Oh--you peeked!  Well, it's to be expected--we did provide a photograph!

This is a lovely example of one of the projects we will be making at Stamp Club this month!  If you live in the South Suburban area of Cook County, IL and you are interested in joining Nanci's Stamp Club, please add a comment to this post and she will contact you!  If you are a Demonstrator who is interested in our Demonstrator Special and would like to offer classes and/or workshops at Lake View Lodge in Dowagiac, MI, please comment to this post also.

Paper: Greenhouse Gala DSP, Baja Breeze, Daffodil Delight, and Chocolate Chip cardstock
Punches: Modern Label, Word Window, Boho Blossoms, and Ornament Extra-large
Stampset: Awash with Flowers and Teeny Tiny Wishes
Misc: Dazzling Diamonds and Dimensionals

Monday, August 23, 2010

Note Card Sets with Mini Milk Cartons


 Isn't this note card set adorable?  It looks so cute with the pumpkins from Sew Many Pleasures (Saturday's post) in the background!  There are six matching 3.75"x4" note cards with envelopes inside the box.  The mini-milk carton is perfect for storing paper clips, rubber bands, thumbtacks, or my personal favorite--chocolate!  Nanci based it on the design from a kit she purchased from Pine Cone Press at CHA Summer 2010.
Here's another look at the same project.  Same papers in a smaller size and a completely different look!  The Play Date DSP is extremely versatile.  The matching cards in this set measure 3"x4"--5 cards will fit inside the holder.  The flower has four layers and is adhered with dimensionals.  Either set would make an excellent gift! 

Supplies: Play Date DSP, Crumbcake, Tempting Turquoise, Real Red, Old Olive, So Saffron Cardstock, Chocolate Chip Ink, Apple Blossom Stampset, Boho Blossom, Five Petal Flower, Scallop border, Modern Label, and Word window Punch, Tim Holtz hinge clips, Misc. Brads and Ribbon

Thanks for visiting our blog--we love your comments!  Happy crafting!

Saturday, August 21, 2010

Fall - Chenille Pumpkins - Retreats!

Fall is right around the corner and so is our first full season offering crafting retreats at Lake View Lodge!  We were out and about in Dowagiac, MI the other day and found this great store less than 3 miles from Lake View Lodge!  It's called Sew Many Pleasures  and it is absolutely a pleasure to visit!  Kathyrn Wise, the owner, specializes in Gifts and Collectibles.  We fell in love with these chenille pumpkins!  
Nanci bought them for her house, but they are at my house right now--I don't know if I can give them back! :)       


Kathy's shop is filled with hand-made "gems" like these pumpkins.  She is a charming woman and a master-crafter!  Kathy has graciously offered to teach a class at Lake View Lodge on how to make these adorable pumpkins.  If you would like to sign up for a class with Kathy at Lake View Lodge, please contact us at info@crafthavenretreats.com.  We are still accepting reservations for our 2010 fall weekend special--$199 per person!  Visit our website at CraftHavenRetreats.com.


If you are in the Dowagiac, MI area, please stop in and visit Kathy at Sew Many Pleasures her shop is a delight to the eye!  Sew Many Pleasures is open Wed-Sun from 10 AM-5 PM, May-November, Phone: 269-424-3467, Cell: 269-208-3094.  Happy Crafting! 

Friday, August 20, 2010

Play Date DSP With an Owl


Make a date to play with this paper!  It's fabulous.  Have you tried the owl punch?  It's fast and fun--I added the little vest and pointer!  How sweet is this trio?  It would make a great teacher gift set.   The matchbox slides open to reveal it's contents to the recipient.


Supplies: Play Date DSP, Crumbcake, Tempting Turquoise, Real Red, Old Olive, and So Saffron cardstock
Hostess Apple Blossom Stamp set with Real Red Ink 
Modern Label, Word Window, Boho Blossom and Five Petal Flower punches
Misc. ribbon and brad

Wednesday, August 18, 2010

Presto Pattern Projects


The ideas for two of these cards came from Gina K. of Stamp TV and Linda Walsh, Stampin' Up! Demonstrator in Massachusettes.  I had watched both of these two video tutorials and thought that the techniques used were excellent.  


The "you're too kind" card uses the altered Presto Patterns DSP panels from my post on August 17th.  


The '"thinking of you" card features a stamped image that has been quartered to offer a window effect also.


The "Bonjour" card is my own design.  I stamped the white cardstock with Versamark and clear embossing powder to create my own presto pattern paper.  I used a dauber to apply Red Riding Hood ink to the surface and sprayed it with Silver Smooch spray just like the panels in the "you're too kind" card.  I wiped the excess ink from the surface with a paper towel to pop the white resist areas.  I cut the Bonjour and the telephone on the Cricut Expression using the Sentimentals cartridge.  

Products used are Stampin' Up! unless noted otherwise.  The list of materials used is as follows:

Papers--Presto Patterns Specialty Paper, Love Letter DSP
Cardstock--Red Riding Hood, Basic Black, Whisper White, Basic Gray
Inks--Red Riding Hood, Basic Black
Stamps--Teeny Tiny Wishes, Whimsical Words, Stain Glass Window-The Stamp Mill, Background K-3219-unknown
Punches--Scallop Oval, Oval, Scallop Circle, Circle
Embellishments--JoAnne Woven Edge Ribbon, White gel pen, Stampin' Dimensionals, Unknown Crstals

Tuesday, August 17, 2010

Stampin' Up! Presto Patterns DSP Samples

I have a package of the new Presto Patterns Designer Series Paper.  If you haven't seen this paper before it looks like white paper that's had a pattern embossed on it with clear embossing powder.  When you apply any type of ink or color medium to it--it absorbs the color in some places and resists in other areas to reveal the pattern--Presto Pattern!

This is a sample of the paper before color has been applied.  You can see the pattern up close or when the light hits it.


I applied Log Cabin Smooch spray to this piece.  I sprayed it on and then rubbed it off with a paper towel.  It's very shimmery!


These next samples I used a dauber to apply Red Riding Hood Classic Ink, removed the excess ink with a paper towel.  Then I sprayed it lightly with Silver Smooch spray and removed the excess with a paper towel.


This last sample I applied Always Artichoke ink using the stamp pad directly on the paper and then blotting with a paper towel.  Then I added Cajun Craze with a dauber and wiped off the excess ink again.  Then I took the large Aqua painter brush and applied it randomly to the paper in a few places and dabbed the excess water off.  

There are several other patterns in the paper pack and you can customize them to fit any color scheme!  Tomorrow I'll post a couple of the finished projects! 

Sunday, August 15, 2010

Sure Cuts A Lot 2 Review

I finally had some time to try out the Sure Cuts A Lot 2 Software by Craft Edge that I purchased at CHA Summer 2010.    I purchased the SCAL software from JoeR@createNcraft.com.  He offers support to anyone who purchases Sure Cuts A Lot 2 from him.  The software was really easy to load and use.  I found free .svg files on the internet at http://svgcuts.com/blog/ that I could download and use within a minute!

Here are the results!


I did not experience any paper tears or areas that weren't cut through.  Here is a closeup of the details from both cards.


I found the SCAL easier to use than Design Studio.  Both Cards are made with Stampin' Up! Love Letter DSP, Red Riding Hood Classic Ink, and Martha Stewart birthstone gem stickers.   Happy crafting! :)

Friday, August 13, 2010

Relay for Life 2010 Team and Fundraising Projects

ACS Relay for Life Sangamon County 2010
Fighters For Our Future Team


Our team raised $8,198.05 this year!  Go Team!


Nanci and I made these cute card holders for the balloon "pop" fundraiser.  Aren't they sweet?


The purses have six note cards with envelopes in them and the card folder has 4 cards with envelopes.  Craft Haven Retreats donated a weekend retreat for two to the silent auction also.   We'll be posting a fundraising project for next year's Relay soon!

Wednesday, August 11, 2010

Make 'n Takes From CHA Summer 2010


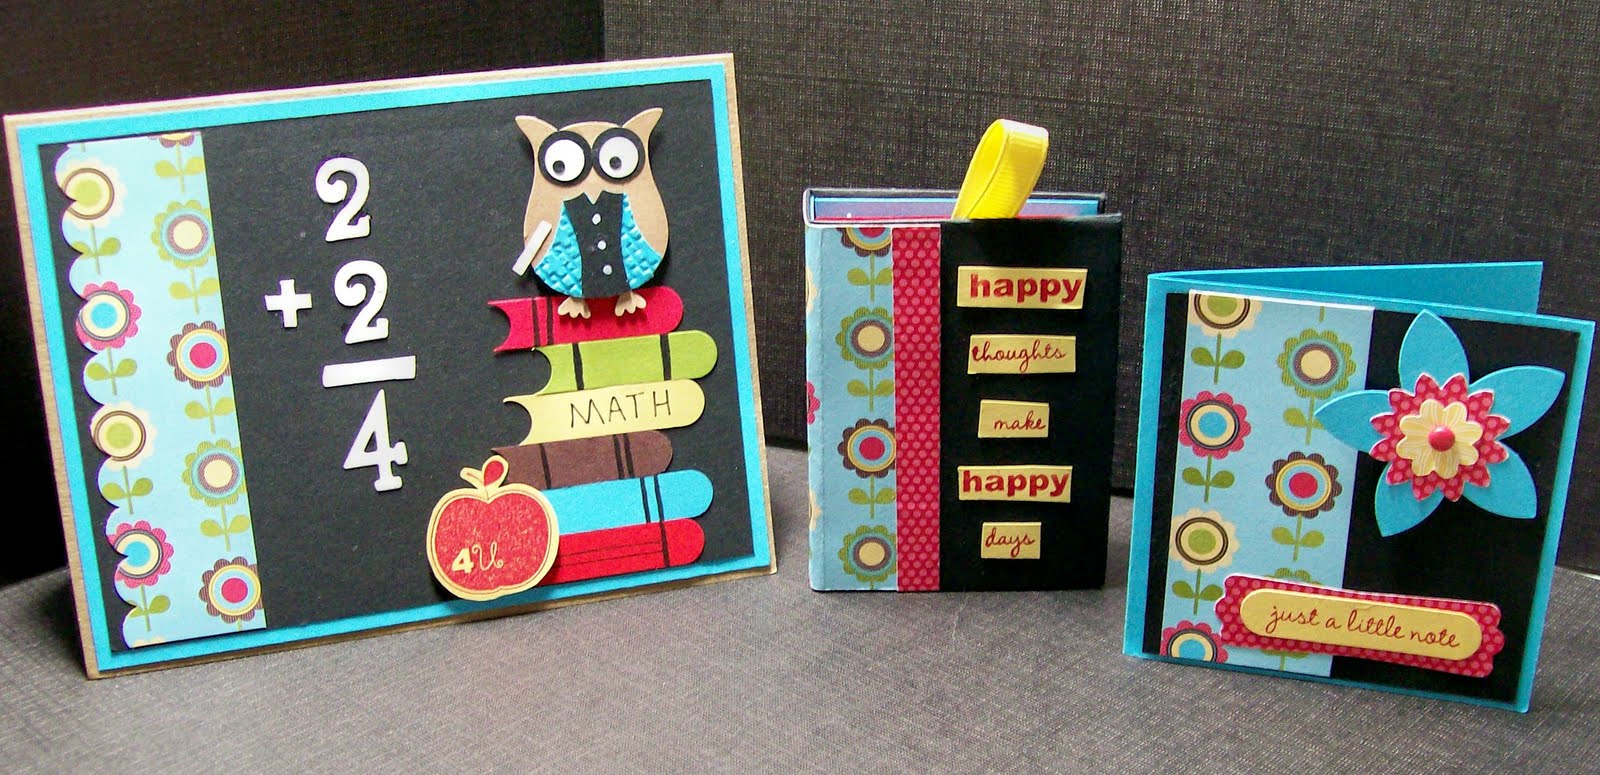
Nanci and I had such a good time at CHA Summer 2010.  We met some crafty-fun-interesting people there!  These are some of the Make 'n Takes projects I did while we were there!


I finally bought the Sure Cuts A Lot 2 (SCAL) software (that I have been talking about buying for at least a year) from Joe Rotella at  Create & Craft.  I am looking forward to creating some great projects on the Cricut with this software!

We hope to offer a retreat later this year that will feature classes offered by  Joe and the Create & Craft group.

I think I mentioned a couple of posts ago that we met Beate at the Splitcoaststampers.com booth?  She actually worked with us on the two make n' take projects we made at their booth!  She introduced us to Copic markers and grunge paper!  I am dying to take a Copic class now! :)


This is the pin we made with Copic markers at the Splitcoaststampers.com booth.  I had never used Copic markers before--Beate gave us some tips about using the Copic markers!  Did I mention that already?


She also helped us make these bracelets using grunge paper with Tim Holtz distress inks and hardware.  We wore our bracelets the entire day.  Mine had a bright pink button originally, but I put my hand inside my purse too many times that day--I lost it somewhere between the fresh raspberry smoothie and the Cricut booth.  I found this button in my sewing basket.  It's not pink, but I think it will do.


This Tweet-heart pop-up card we made at the Custom Crops booth.  The design and technique were really fast and fun!  I smeared my stamp--but that's the beauty of a handmade card.

Last night when I was catching up on some e-mail and blogs I follow, I noticed that one of the ladies who helped us make this card at the Custom Crops booth, Donna Mundinger, writes one of the blogs I follow - Popsicle Toes!  She had some photos from the booth on her blog!


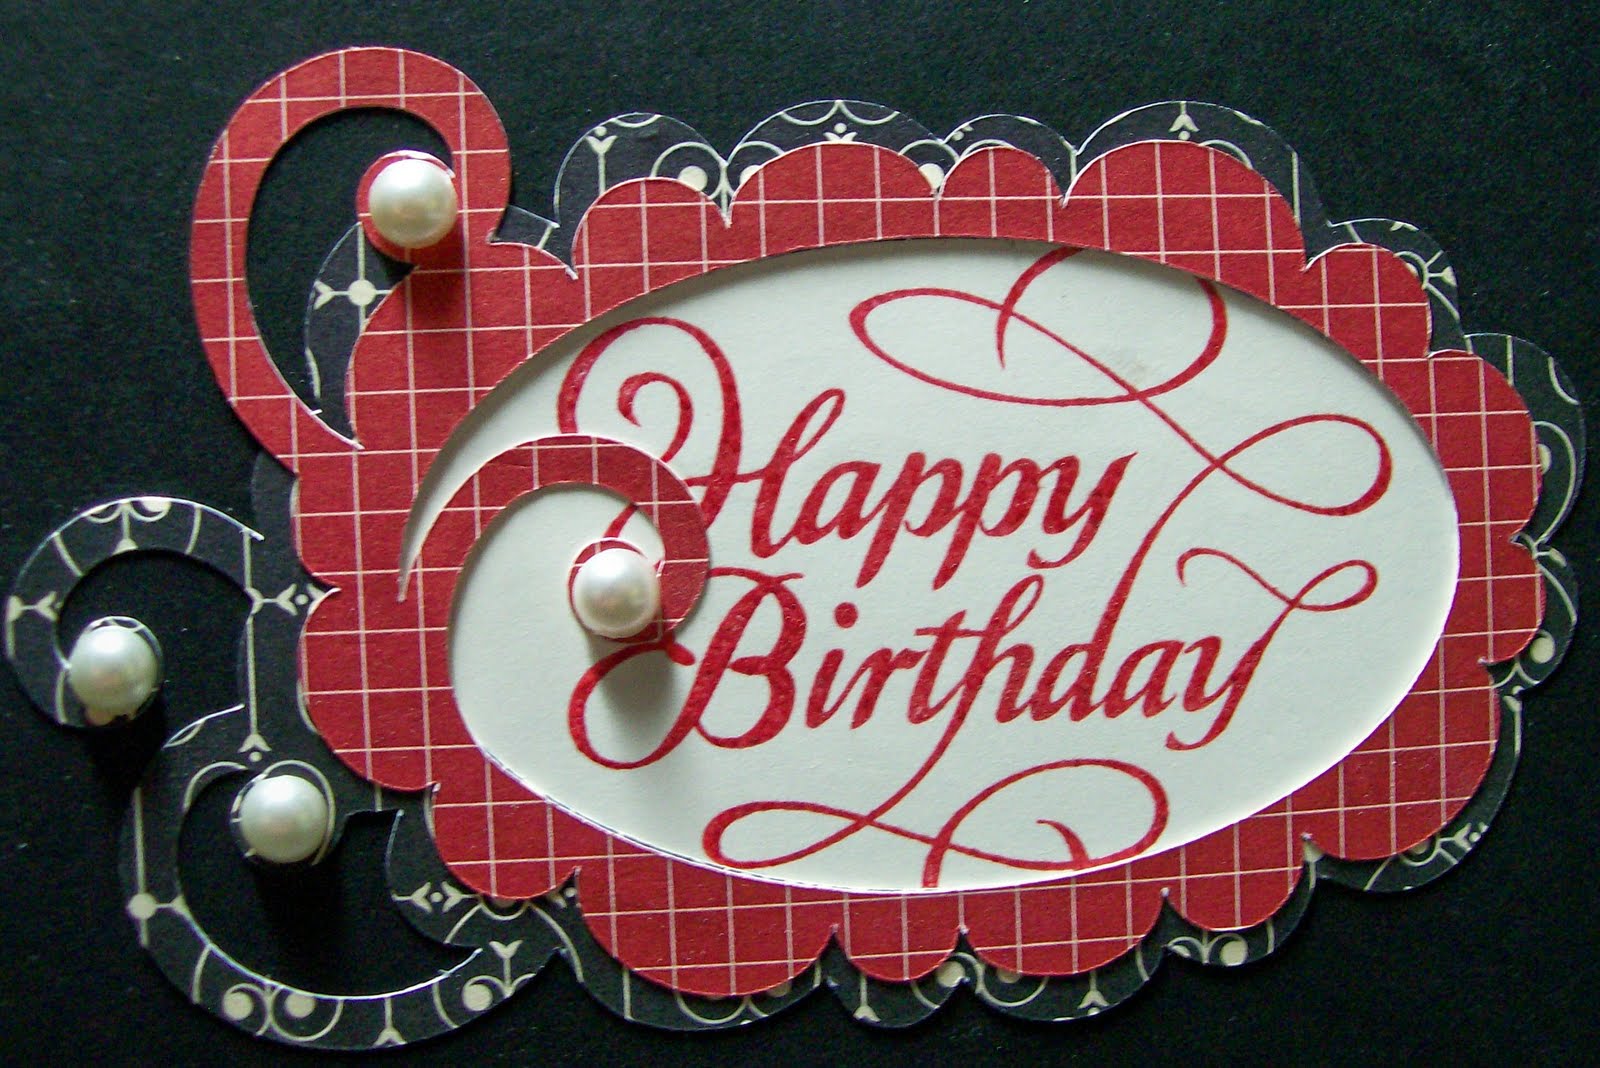
We made this birthday card make n' take at the eksuccess brands booth!  They were using Martha Stewart punches, K&Company paper, Jolee's stickers, Inkadinkado stamps & dyes!  We also signed up for a new crafting web site there called SpottedCanary.com. We even came home with SpottedCanary t-shirts!


Last but not least we made this adorable pin-wheel tag at the Unity StampCompany booth.  Love their papers and stamps! :)

While we were waiting to get inside, we met two ladies who had traveled from New Zealand and Malaysia to attend CHA!  It was our first visit to CHA and we would definitely go again!

Monday, August 9, 2010

We Like Demonstrators Dance Video from Stampin' Up!

I heard this song for the first time on Saturday afternoon.  Later that evening I saw a post of this video.  I hope you enjoy it! :)


Happy Crafting! :)

Saturday, August 7, 2010

DEMONSTRATOR SPECIAL

Welcome Stampin' Up! Demonstrators!  Have you ever dreamed of an entire weekend to do nothing but craft?  Well, we can make your dreams come true!

Craft Haven Retreats offers an all-inclusive weekend retreat for crafters of all types.  We specialize in card making and scrapbooking, offering the use of our craft room tools and equipment to compliment all of your Stampin' Up! projects!  We have the Cricut Expression with an extensive library of cartridges, Big Shot with dies, Zutter Binder and more.


We're offering a DEMONSTRATOR SPECIAL - Demonstrators who bring 6 or more guests stay FREE! Our all-inclusive weekend retreats provide a perfect opportunity for demonstators to share their passion with customers, downlines, or friends! In addition to providing delicious home-cooked meals, snacks and lodging, we offer a craft room equipped with individual work tables, craft lighting, and the free use of our extensive tools and equipment.

Host your own workshops for the weekend - whether it be training, techniques, card making, scrapbooking or just playing with new stamps and accessories. We do the rest! We'll work with you to customize your Weekend Retreat to fit your needs.

We're located in the beautiful Sister Lakes Michigan area, just an hour and 45 minutes from Chicago. Our location in Michigan offers beautiful fall foilage with lots of side activities including apple and fruit orchards, antique and craft shopping, wine vinyards tours with taste testing, and just relaxing by the lake. Why not plan a Stampin' Up! getaway weekend now! We're offering a Special Fall Rate of $199 per person--remember--YOU STAY FREE!

Call or e-mail us for more information. We would love to hear from you!

Nanci 708-259-7482

Melannie 708-441-9531

July Stamp Club

At our July Stamp Clup we featured the gorgeous Bella Bleu DSP.  So sad to see this paper go!  We made a darling drawer box using Holly McMillen's tutorial found here at Split Coast Stampers.  Our 5 cards and envelopes fit perfectly inside. So nice for gift giving or display!


The paper flowers were made using this technique featured in Julie Buhler's Paper Pleasing Ideas tutorial found here.


Drawer top decorated with leaves from the Bird Punch and these fabulous paper flowers.


Border punches always add so much!


Everyone loved the new Elegant Lines embossing folder!


Elegant Bouquet embossed on Top Note Die.

Paper:  Bella Bleu DSP, Almost Navy, Craft (not SU, substituted because my Crumb Cake didn't arrive in time)
Stamps:  Vintage Vogue, Just Believe, Teeny Tiny Wishes
Embossing Folders:  Elegant Bouquet, Elegant Lines, Script (Cuttlebug)
Ink:  Crumb Cake
Misc:  Top Note Die, Bird Punch, Scallop Circle Punch, various Circle Punches, various Oval Punches, Modern Label Punch, Word Window Punch, Scallop Border Punch, Eyelet Border Punch, Dazzling Diamonds, misc. ribbon, twine and small brads

Thanks for stopping by!

Nanci

Wednesday, August 4, 2010

Flowers For You!

This sweet Flower Pot Pocket card is fresh, fun, and easy to make!  I used up some leftover paper I had from a Close to My Heart paper pack.  I didn't have the punches with me to make the flowers in the tutorial, so I improvised with the Cricut cartridge - Walk in My Garden.  "Pick" the flowers out of the pot to reveal the sentiment inside with space for a personalized message too.

Check out the tutorial for this card here at Splitcoaststampers.com.   At the bottom of the instructions page is a video tutorial by Beate--she makes the best video tutorials!

Nanci and I went to CHA Summer 2010 in Rosemont, IL last Friday.  We stopped at the Splitcoaststampers booth and we met Beate! We were both thrilled to meet her--I was star-struck!   We'll post our CHA blog soon!
Related Posts Plugin for WordPress, Blogger...